How To Copper Electroform A Ring
/Learn how to make a gemstone ring using the copper electroforming process. Put your science hat on and gather extra safety gear. This tutorial will explain everything you need to know to electroform your first piece of jewelry!
Along with this tutorial I wrote a post that talked about the supplies you will need to get started so if you're new to this you should check that out. If you already have your supplies then just ignore it or use it as a reference guide on where you can get some good supplies. I will be adding to it periodically the more I discover suppliers.

How To Copper Electroform A Ring by Maker-Monologues.com - Pin this image to your jewelry making board for later reference.
*This post contains affiliate links. I earn a small commission if you purchase any recommended products at no extra cost to you. Affiliate sales help me to keep this blog going so I can continue bringing you free content. Thanks for your support!
For this experiment, the supplies I'm using are as follows (you can use whatever supplies you have on hand, it doesn't have to be the same brand as mine):
3-Amp rectifier (you can use any amp rectifier)
Renaissance wax (Update: I now use ProtectaClear because it's stronger and longer-lasting)
Mason jar (I use the wide mouth as it's easier to get the anode inside. And you may as well get a whole case because they come in handy holding all your tools or other tid-bits in.)
Paint brush (you'll find many uses for different sized paintbrushes)
Copper coil (you can make one by wrapping wire around something that's a little smaller than the inside of your jar, adjust as needed.)
Copper bus bar (you can make this out of your copper coil wire.)
Distilled water
Gemstones (or whatever you want to electroform)
Step 1: Glue


Take your super glue and glue your crystal to your ring shank. I feel it's easiest to dab a bit of glue on your ring shank first then place your crystal on top, wait for it to dry a bit then add another drop of glue to the bottom end to secure it even more. Wait for it to dry completely then move on to Step 2.
A lot of crystals need to be protected with a varnish before you put them in the acid bath. Visit the list of gems and crystals that need to be sealed before electroforming here.
(I glued 3 beautiful raw rhodizite crystals to my shank.)
Step 2: Epoxy

Next, you want to take your epoxy and apply it to your ring. You want to create filler between the stone and metal so you have a strong, durable base. After the epoxy dries completely, which should take a few hours (check your epoxy jar for instructions), you want to take a file and smooth it out to create a nice shape. Or you can use a Dremel with a soft sanding bit, but be easy on it as to not break up the epoxy. (It would save you the work out of filing if you're doing multiple pieces production style!)
[UPDATE: It's better to file all the epoxy away leaving it only to fill the empty crevasses between the stone and metal. I did not know this when I wrote this tutorial but the inside of your ring should be perfectly circular and the epoxy filed down to the metal. See my How To Get An Accurate Size Reading On Electroformed Rings tutorial)
Step 3: Paint
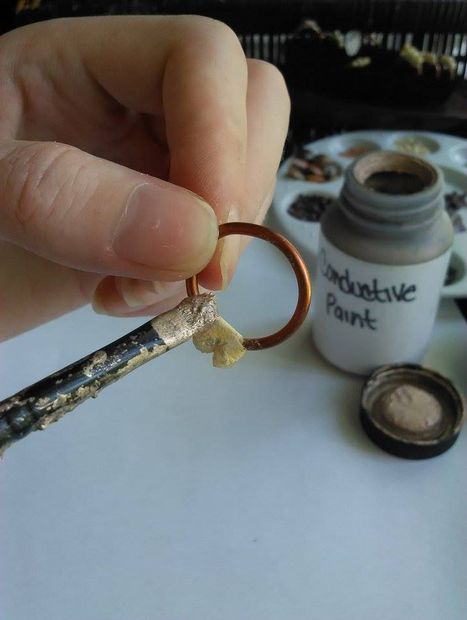
After filing down the epoxy I like to take my Dremel and use the nylon brush to get all the dust off my ring. I don't want it to get in my paint and contaminate it. Then I take my copper conductive paint and paint over the epoxy. I like to paint a little past the epoxy so the copper hugs my crystals nicely. Some paints need a bit of water to dilute it so you can use distilled water for this.
The reason you want to use distilled as opposed to tap water or purified water is that tap water has lots of impurities and purified water, while not as much as tap, can have impurities in it as well. So you don't want that to contaminate your paint which would, in turn, contaminate your solution. No bueno.
I like to put 2 coats of paint making sure the first coat is completely dry before adding the second. Let dry completely before moving on. This takes a few hours.
Step 4: Wire Up


Next, you are going to loop your thin gauge wire around your ring shank and twist it back into itself. This is going to be your cathode. Some like to make sure the wire actually touches the paint so if you do that you need to make sure your wire doesn't stick to your piece so adjusting it every hour or so is needed. (Update: I never make sure the wire is touching the paint, mostly because it can mess up your paint, but also because I've never really seen a reason to. My pieces always come out fully electroformed. Just a little thought that can save a lot of hassle.)
You also want to create a bus bar to suspend your ring in the bath. I like to make a curve in the middle and angles on either side so it stays put over my mason jar. Make sure yours fits your tub, jar, or whatever you're using. Then wrap your thin wire around the thick wire like shown above. Set it in place in your bath. I've seen others use chopsticks for a bus bar so you can go in that direction as well.
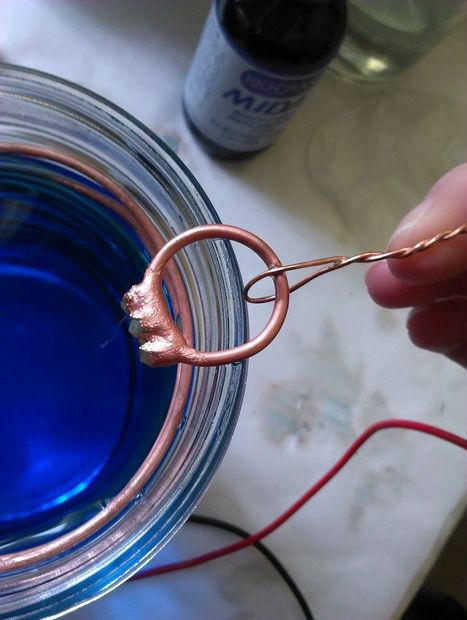
Step 5: Preparing Your Bath


Next, you want to prepare your electroforming bath. First, you need to create a copper coil, this will be your anode. I prefer a coil anode over a sheet anode because the coil will give you an even plate all the way around your piece. I've read that those using a copper sheet have to keep flipping their piece around to get each side nicely plated. Work with whatever you have, there is no right or wrong way as long as you're getting your desired results. That's all we really want, right? Right!
I like to create my coil by wrapping a large vitamin bottle with my wire which creates a perfect coil to fit my mason jar. You want to create a little "hook" that will come out of the top of your beaker to attach your positive (red) lead wire clip to. I would say a good inch would suffice. Side note: Your coil doesn't have to be as "beefed up" as mine. I usually do about 4-5 coils but I figured this one would last a lot longer before having to switch it out.
After your coil is in place you want to pour in your solution. Make sure you pour enough that will keep your piece submerged.
Step 6: Attach Your Leads

With your rectifier off you want to attach your negative (black) lead wire to your cathode and your positive (red) lead wire to your anode. Make sure your cathode is not touching your anode so try to keep your cathode suspended in the middle of your bath.
Step 7: Electroform!


Now it's time to get electric! The standard measurement is 30 square inches of plating per 3-amp so that would be 10 square inches per 1-amp. I like to set my amperage on 0.30 at first for one ring then check after 30 minutes to see if I need to turn it up or down.
[UPDATE: It's been brought to my attention that most power supplies are different from the one I'm using in this tutorial. Most folks say that .1 is a better setting for a single ring. (check out my latest tutorial where I'm using a 10-amp power supply and .2 is the norm for that one) This power supply did just fine at .30, so I would create a test piece and start out at the lowest setting and make adjustments from there and create a measurement sheet to keep on hand.]
A good indication for knowing whether you should turn it up or down is if it has a pink (salmon-like) color then your amperage is too low. So turn it up a tad and check again in 30 minutes. If you are getting tiny bumps, knots, or a browning color then it's too high. Turn it down a bit and check again in 30 minutes.
If you get really big bumps then you can take your Dremel or other rotary tool and use the hard stone sanding bits and grind it back to a semi-smooth surface. Then try again on a lower setting. Keep in mind you don't want your ring shank to be too thick.
You can create your own measurement sheet to help you remember what amps you need based on the size and shape of the pieces you will be doing on a regular basis. I like to keep a single ring in the bath for about 6-8 hours. A good tip: slow and steady wins the race. Don't try to rush the process because you'll either burn it or get a really uneven coat that may flake off. So patients is key.
I also like to put a lid over my bath just to slow the evaporation process. We all know how costly this solution is! In case you're wondering, my voltage dropped a bit in this second photo. Sometimes the numbers will jump back and forth if you're dial is right on the line of two volumes even though the amp is the same. That's totally normal, it ended up jumping back up to 00.6.
Step 8: Take Your Piece Out

This was after taking the ring out of the bath. Your piece should be nice a shiny like this. But after a while, your solution will deplete its acid so that's when you'll need to add some copper brightener and top off what has evaporated with distilled water to it to bring that shine right back. If you do get a dull result then take your brass brush and give it a good scrub and it should shine it up really nice. Then rinse it in distilled water to get any solution off. You can use tap or other water for rinsing AFTER electroforming but the reason people use distilled is that it doesn't have impurities like tap water so it won't oxidize your piece as fast, or so I've read. I have used both and have seen no difference.
Step 9: Finishing Touches

You can either patina it with some liver of sulfur or you can leave it as is and seal it with your choice of sealer. I will be keeping this one as is so I just apply my renaissance wax and viola!

What a beauty if I may say so myself! I never get tired of seeing these beautiful copper electroformed pieces with raw crystals! I hope you enjoyed this tutorial. Please let me know how your piece(s) came out! If you have any questions just post below and I'll try to answer the best I can or I'll find some resources for you.
Be sure to save this post to your jewelry-making Pinterest Board and why not give me a follow while you're there!

Come join my Facebook group 'Electroforming - Artists & Jewelry Designers.' A place for artists to come together and share tips, tricks, or ask questions. Hope to see you there!
If you have any questions about anything I've mentioned here please leave a comment below rather than emailing me your question. It would be better if I answered your question publicly for all to see who may have the same question rather than answering the same question multiple times via email. I get to questions a lot quicker via blog comments. Thanks!