How to connect design components for copper electroforming jewelry
/Electroforming has so many cool paths to go down using different components made up of a variety of materials such as plastic, metal, stone, etc. Connecting these different mediums means you will need some type of adhesive whether it be superglue, resin, epoxy, and so forth. The options are truly endless and it can be quite overwhelming to know where to start.
We've teamed up with some wonderful and talented electroformers to give you their electroforming tips and tricks for creating awesome jewelry designs.
Diane from Diane Anderson Art says:
“I use UV resin to adhere my pieces for electroforming. Specifically, I use the Bondic UV Resin gel pen. The gel sets with light instead of time or air – it takes about 5 seconds of light to cure the resin.
The pen comes with a tiny UV squeeze light that can be switched to constant on if needed. Keep in mind that this is meant for really small jobs and is not permanent. If you need a permanent bond, you would need another type of glue or adhesive.
I use the gel to very quickly adhere jump rings, put stones together, or add small embellishments. There is no more messy superglue and baking soda, no more waiting for an adhesive to set permanently overnight, and no more gluing my fingers together!
Keep the following in mind when using this resin pen:

“1. The resin cures with light – you need to be able to shine the light on the resin to make it set, so deep crevices or backs of opaque stones will not allow the light through.
2. This bond is not permanent – you will have to electroform over the join to make it secure and lasting.
3. The bond is fragile – if you drop your piece, get ready to pick off all the resin chunks and start over.
4. The gel is beautifully fluid and thick so creates a nice round ball if needed or can get into small areas.
5. This resin comes out of the pen in a thick liquid that can be used to make bumps or dots under your electroformed metal – I sometimes use dots as embellishments.”

The photo is an example of embellishing with the resin in addition to using it as an adhesive.
Dave from Heady Metal Designs says:
“I like JB Super Weld UV because it allows you to dry the glue in around 10 seconds and helps you to work much more quickly.”
Follow Heady Metal Designs on Instagram.
Shane from Infiniteal Chemics says:
“When it comes to connecting objects in electroforming there is no one true adhesive. Pick the right adhesive for the right job.
Super glue is great for holds between two relatively flat and level surfaces. I prefer a super glue gel to fill in some of the gaps better. It can be fast-cured by sprinkling baking soda over the curing glue.
Apoxy Sculpt is great for needing to fill large amounts of gap space and allows for carving and traditional sculpting techniques to be used in creation.
J-B Weld Steelstik is perfect for when you need two parts to withstand large amounts of force or load. Great for large vessels and attaching things like antlers.
Identifying what adhesive works best for you will take time and practice. But with a little forethought and experimentation, you will find what suits you best.”
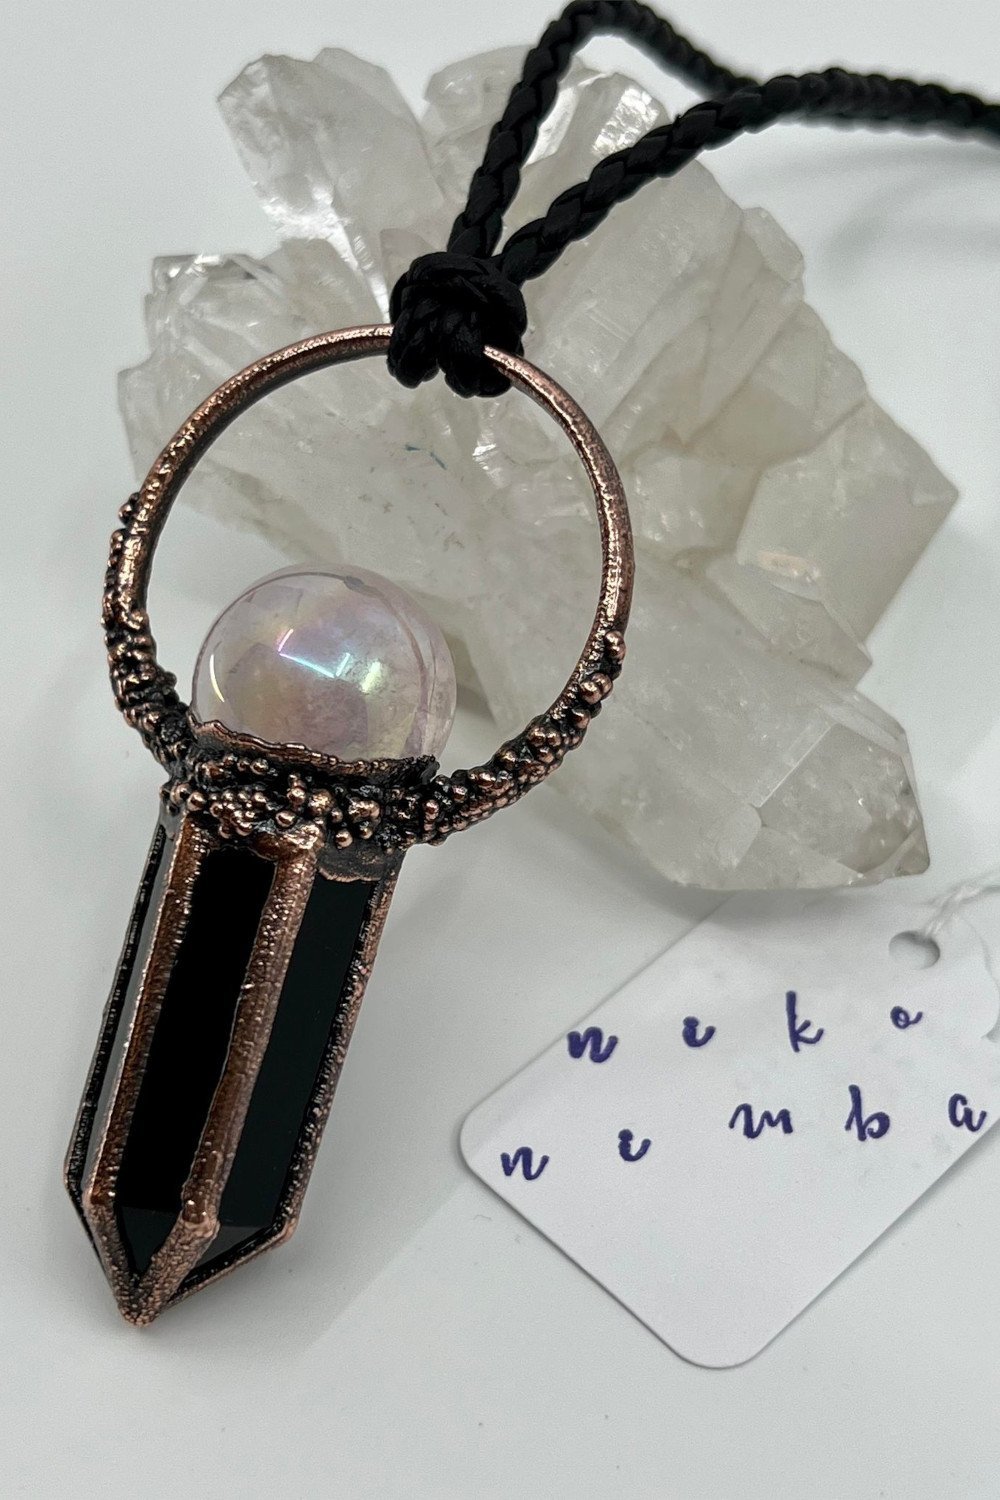
Nikolette from Niko Nimba says:
“UV Resin
UV resin comes as a thick liquid and requires a UV curing lamp to set. These are the same lamps you will see in a nail salon and are about $20. UV resin is great for attaching elements of a design together. The most important consideration is that it can only cure if light can get through, so it will not work for stacking two opaque stones on top of each other.
This is my favorite method for securing ring bands to stones or attaching jump rings for pendants. It only requires you to hold the two pieces together for 5-10 seconds. I start with a very small dab of resin on each piece to be joined, turn on the lamp, and hold the pieces in place under the light.
For rings, I use tacky putty to hold the stone in place on a tray, that way I’m not scrambling for more hands.


“After the quick set, I check the alignment of the piece, if it looks crooked it is easy to just separate the pieces and redo it. I keep a razor blade at my station to get the partially cured resin off the pieces before trying again.
When the pieces are aligned properly, you can then begin building up the resin. It works perfectly fine to do layers. With rings, this allows a smooth and clean transition from the stone to the band.
I then keep the pieces under the curing lamp for about 20 minutes. If they are still tacky, you can place them in direct sunlight or allow about 24 hours before moving on to the next steps.
My favorite tools for this method are silicone nail art pens. If resin gets cured onto the silicone tip, it comes right off. Uncured resin can be wiped off with a paper towel.

“Rather than trying to work from a large bottle of resin, I pour a small amount into a silicone wax container, as much as I think I’ll use in one sitting. If there is leftover that hasn’t begun to cure, it can be used later. To remove from the container I just cure the leftovers under the lamp and then they pop right out.
Here’s a design being put together with UV resin before adding conductive paint. The third imagine is the design after conductive paint and electroforming.


“Apoxie Sculpt
Apoxie Sculpt is a two-part clay. It requires mixing equal parts of clay and hardener together for several minutes, and working time is limited as it hardens without heating.
This is a great option for filling large gaps/negative space, or for sculpting forms and is beneficial to makers who already have sculpting skills or want to develop them. You can make designs, let them harden, and add them on to other design elements later, or simply utilize the clay to join to pieces together.
With two-part clay, it’s important to accurately evaluate how much to mix at a time--too much and it begins hardening before you have been able to work all of the material or you have more than you need and are throwing some away; too little and you are having to stop to mix more material in the middle of a design.
When using Apoxie Sculpt, it’s helpful to have a bowl of water on hand to wash areas you don’t want the clay residue to set, and to smooth the surface of the clay of fingerprints or small indents. You can use typical clay sculpting tools to create more intricacy in your designs.
Apoxie clay is sandable after hardened, however, a respirator mask is advised.


“Here’s an example of a piece using Apoxie Sculpt (unfortunately no before plating pics).
Between the arrowhead and the antler, a large gap was filled with Apoxie Sculpt to have the arrowhead lifted up and forward facing. The large hoops were pushed down into the clay to help support the structural integrity of the design.
Superglue
I am notorious for getting super glue all over my fingers, although that isn’t the biggest draw back for me with this joining method. Typically when I’m placing an item I can’t sit there holding it while I wait for the glue to set. Some makers sprinkle baking soda to cause a quick set reaction in the glue faster. For me, UV Resin has replaced super glue nearly altogether. I will still use it for setting an accent stone on top of another stone.”
I thought I would share my technique as well.
What I've always done is use liquid superglue, not gel kind of super glue. I've always been a fan of the Loctite brand. I apply the most minuscule amount of glue I can get away with and connect the pieces together.
The trick is to hold the pieces steady for 30 seconds without them moving, I notice once you move and that initial bond is lost, you really have a hard time getting that bond to stick after a layer of glue has already dried on either side of the connection points.
Once the two pieces are glued whether or not I use epoxy only matters if there are gaps to fill between the pieces. The layer of electroformed copper is strong enough to keep the different design components together if you don't need epoxy to fill gaps.
If I'm gluing a 1mm flat copper wire to a flat surface of, say a stone, then there aren't going to be gaps to fill. In this case, I won't use epoxy. But If I'm gluing two rough gemstones together there are more than liking going to be gaps to fill. That's when I fill just the gaps with a 2-part epoxy such as Apoxie Sculpt.
This blog post I created where I redesigned a copper electroformed pendant explains this process:

Components held together using superglue and 2-part epoxy.

Copper conductive paint applied to pendant.

Finished Copper electroformed quartz point pendnat.
Next, I applied the copper conductive paint, creating that geometric design element she wanted. You can see that I didn’t add any epoxy on the back of the stone to fill that void. I didn’t think this piece needed it and my friend agreed. (That bump you see above the cabochon on the left is part of the quartz.)
Our community is all about sharing and helping each other learn the craft of copper electroforming, so if you have a technique you'd like to share, or if you have any questions, please leave us a comment below!