How To Make A Prong Setting Ring
/I've been wanting to create this tutorial for a while and I've finally got around to it. If you're new to silversmithing then I highly suggest you check out my other tutorials; How to Make A Silver Ring Band and How To Make A Bezel Setting first because prong settings, although they look easier to make, are actually quite difficult.
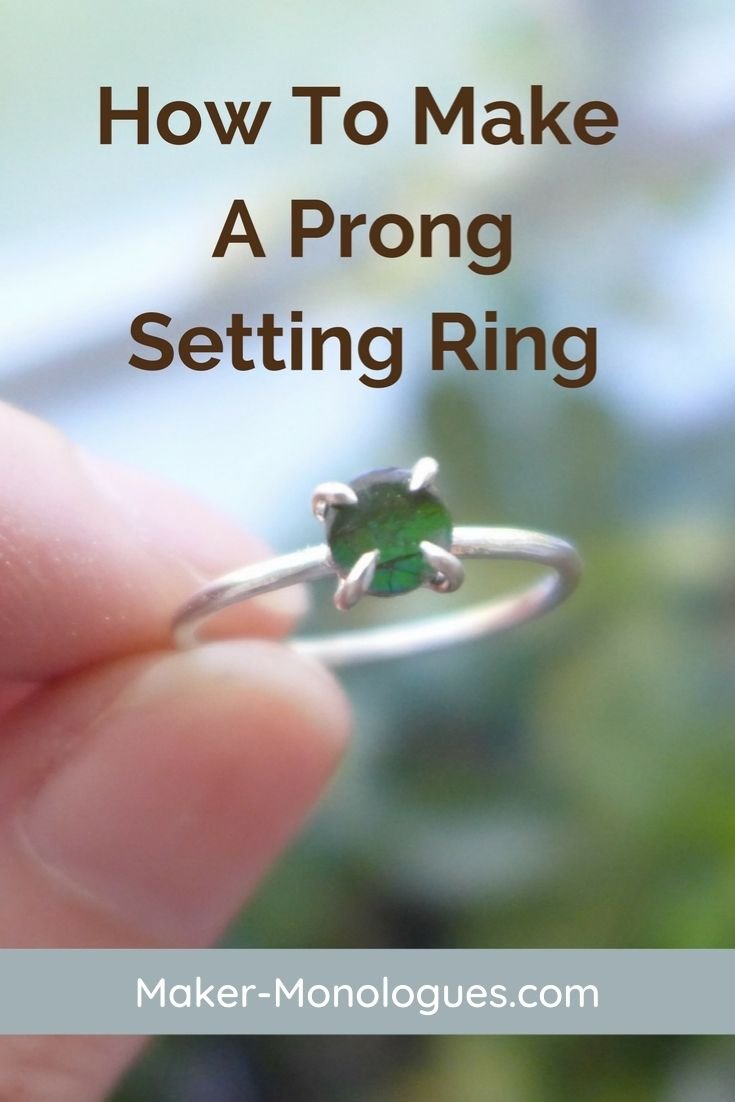
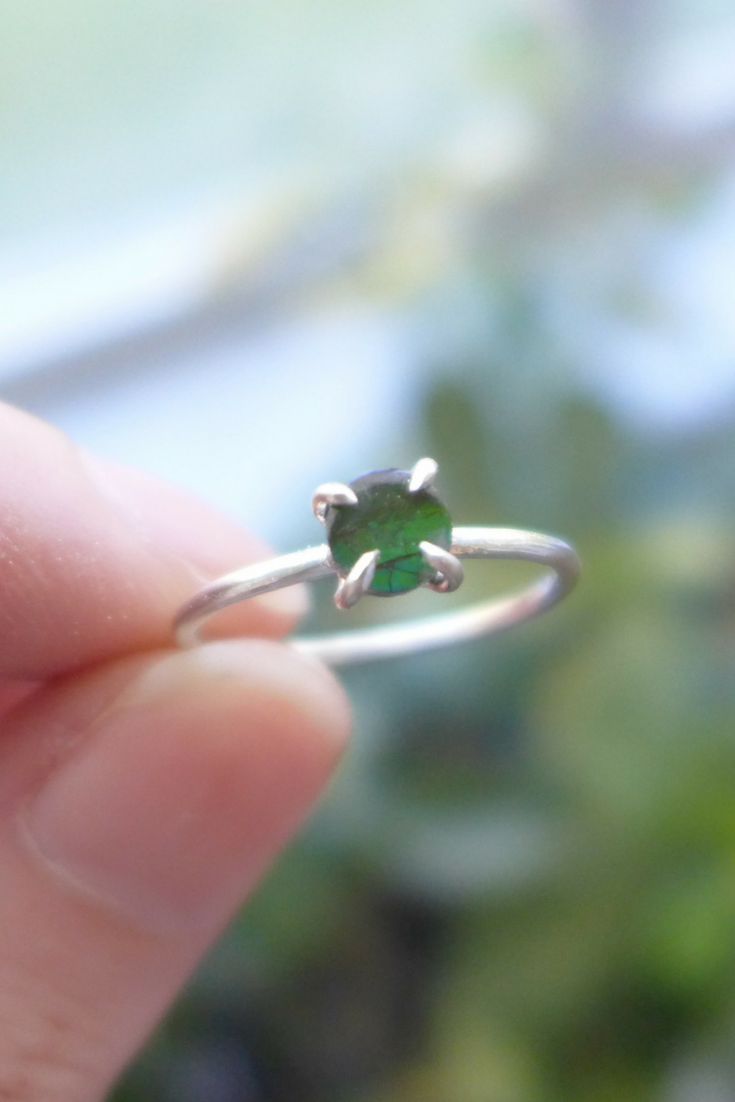
How To Make A Prong Setting Ring by Maker-Monologues.com
*This post contains affiliate links. Affiliate sales help me to keep this blog going so I can continue bringing you free content. Thanks for your support!
Also, when choosing your stone, fossil, or whatever else you're planning on setting in the prongs, be sure to start out with a flat back stone. Irregularly shaped stones can be very difficult to try on your first attempt. So it's best to get the technique down with an easier stone.
Here's what you'll need (if this is your first time I suggest practicing in copper or brass):
+ Solderite board (alternatively you can use a charcoal block)
+ Soldering pick
+ Torch (I'm using the Dremel VersaTip Butane Torch)
+ Solder (hard, medium, and easy)
+ Flux
+ Jewelers tweezers
+ Third hand
+ Calipers (I did hours of research for the best digital calipers and the iGaging EZ Cal Calipers have not disappointed)
+ 16g dead soft round wire
+ 20g 1/2 hard round wire (I like 1/2 hard for the prongs because they're stronger)
+ Pickle pot
+ Pickle solution (I use one cup of distilled vinegar + 1 tbsp of salt)
+ Copper tongs
+ Parallel jaw pliers
+ Round nose pliers (or flat/half round pliers)
+ Rawhide mallet
+ Ring mandrel
+ Bench pin with anvil
+ #2 cut half round file
+ 600 grit sanding stick (take 600 grit sand paper and wrap it around a wooden stick, about 1" x .5" x 6")
+ Rotary tool (I use a Dremel 3000)
+ Rubber wheel
+ Variety of radial discs (alternatively you can use a felt tip with tripoli followed by a cotton buff with zam or rouge for polishing)
+ Tumbler (optional)
+ Ring clamp
+ Prong + bezel pusher
+ Fine point Sharpie
+ Something to set (I'm going to use a tiny 5mm backed ammolite - I would recommend using something bigger for your first time)
You can also find more supplies in my Silversmithing: What You Need To Get Started guide or my Shop Supplies page.

Step 1 | Measure and Cut Your Wire

Take your calipers and measure the diameter of your stone. Mine is 5mm. So all I had to do was find a jump ring for the base of my setting. A 4mm jump ring is the perfect size. If you have a larger stone or a freeform shape cabochon then lay your stone on a sheet of paper and draw a line around the perimeter of your stone. Then start to form your base wire to match that shape using your pliers keeping in mind that your stone needs to sit on top of the wire so make it a bit smaller than the outline you drew, basically you don't want your base wire protruding out further than the diameter of your stone. I'm using a 20g jump ring, the bigger your stone the thicker your wire needs to be for durability, you'll have to be the judge of this.
Once you have your base wire completed place your stone back over the outline you drew and determine where you want your prongs to go. You don't want your prongs to go over an outward corner, you want to place them on a flat spot or an inward corner if you can. Obviously, if you're setting a round stone, like myself, then it doesn't matter where you put your prongs just as long as you have a north prong, south prong, east prong, and west prong, and that there's nowhere your stone can possible fall out.
You can add as many prongs as you want as long as you've got the main prongs in place. I'm also using 20g 1/2 hard wire for my prongs. Again, the bigger your stone the thicker you want your prongs. I prefer 1/2 hard over dead soft wire so the prongs are more durable. Again, my stone is 5mm so I cut my prong wires at about 9mm so I have more than enough metal to push over my stone. Measure the height of your stone to determine the length of your prong wire. Always add more length than you think you'll need, you can trim it down later.

For my ring shank, I'm making about a size 6. Take your calipers and measure the size of the ring you want via your ring mandrel or your ring sizer tool. Take that measurement and add the thickness of your wire then multiple by pi (3.14) to get the length of wire you need to cut. For example, a size 6 is 16.29mm diameter + the thickness of my wire, 1.26mm x 3.14 = 55.1mm So I cut my ring shank length at 55.1mm.
Step 2 | File The Ends Flush
Make sure your base wire and prong wires are all filed flush. Start with your base wire. Since I'm using a jump ring I just need to make sure it's completely closed so there's absolutely no gap between the two ends.

Don't solder your base wire shut yet, we're going to do that while we solder on our first prong wire. Next, you want to file your prong wires flat so they have a strong connection to your base wire when we go to solder them together.

Step 3 | Solder All The Prongs
You can either solder on your prong wires individually or all at once. I find doing them individually is much easier because you just have to control one wire rather than 4 at the same time.
Lay your base wire on your soldering board. Flux the seam of your base wire. Take one of your prong wires, flux the flat end you filed then place it right up against the seam of your base wire. This will allow you to solder both your base wire seam shut and the prong wire to your base.
Place a tiny piece of hard solder on top, or you can pick solder if you find that easier. Then slowly heat the area with your torch to first dry out the flux, then once the flux goes clear go in more with your torch and circle the area keeping both pieces of wire evenly heated.

Now do the same with the other 3 prongs, using hard solder for it all. Be mindful about where your flame is pointing because it's very easy to melt your wire, especially when you're working with super tiny parts like I am. I actually melted a prong during this tutorial, had to cut a new piece, and re-do it.

I don't measure exact even distances between the prongs. I just eyeball it. I start with my north wire then do my south wire just so that I can at least see a straight line, then I go on to solder the east and west wires.
You can alternatively solder on your prong wires vertically instead of horizontally like I'm doing here. Then you wouldn't need to bend your prong upward. That's what I should've done now that I think about it. I'll probably show that way in a later tutorial.
Step 4 | Form Your Ring Shank
Toss your setting into the pickle and while you wait for that to be cleaned we're going to start on our ring shank.
File the ends of the shank flush. Start forming it around your ring mandrel. Hammer the ends of the wire to your ring mandrel with your rawhide mallet. Take your ring off the mandrel and use your needle nose pliers (you can also use your flat/half round pliers) and start forming the ends of your ring shank in a D shape so the ends come together flush with each other.

Step 5 | Solder The Ring Shank
Once you've got your ends held together by tension you're going to flux the seam and add a piece of hard solder. Next, you're going to heat it with your torch, keeping your flame further away just to dry out your flux. Once it goes clear zero in a little more with your torch, always keeping the flame in motion, keeping both ends of the metal evenly heated as the solder will gravitate toward the hotter surface until you see your solder flow.

Toss your ring shank in the pickle to get clean. By now our setting should be clean so we can go back to working on that.
Step 6 | Clean The Solder Marks Off Your Setting
Now, with your setting out of the pickle, rinse it under water and dry it really well. Take a look at the solder bumps you might have and just take your sanding stick, I like 600 grit sandpaper wrapped around a half-round wood stick, and sand down both sides of your setting flat. Then take your rubber wheel with your rotary tool and clean up the sandpaper scratches.

Step 7 | Bend Your Prongs Upward
Now lay your prong setting on your bench and lay your stone centered on top. With a Sharpie, you're going to mark where the edge of your stone is on each prong. I like the fine point Sharpies because they give you a more accurate marking.

Once you've got all your markings made take your parallel jaw pliers and clamp them down right on that line. Get a good, firm grip of your pliers and push your setting against your anvil using your fingers to hold it steady while pushing your pliers upward forming a 90-degree bend as sharply as possible.
This is going to put a ton of stress on your solder joints if you're setting is like mine where my bends need to be made practically where my solder joints are. So what I would do if I could go back is to make my base jump ring exactly the diameter of my stone then just soldered my prongs on perpendicularly so I wouldn't need to bend them upward at all. If your solder joint is a few millimeters away from where you need to bend then doing this as I'm showing you here is just fine.

Bend up two prongs then slide your stone in to check the fit. Adjust if needed, keep checking your fit, bend your third prong and check your fit one last time before your bend your last prong (or however many prongs you've got).
You're going to want a nice snug, but not too tight, fit.

Step 8 | Trim Your Prong Length
With your stone sitting inside your setting take your flush cutters and trim down the length of your prongs so that there's just enough to surpass the curvature of your stone with a little extra length to be safe, we can trim more off later. My stones aren't cut like regular cabochons, there's not really a dome shape so it's a bit more tricky so I'm going to leave on more length than needed then trim more off later after I've bent them over.
By now our ring shank should be cleaned from the pickle.

Step 9 | Form The Ring Shank
Take your ring shank out of the pickle, rinse it off, dry it good and put it on your ring mandrel. Push it down as far as it will go to start rounding it up then take your rawhide mallet and hammer the lumps and bumps out making it perfectly round.

You might notice the ring is a bit wavy, like a potato chip, so go ahead and place your ring on your anvil and hammer out the bumps with your mallet.

Step 10 | Clean Your Solder Joint
Now you're going to want to clean up your solder joint on your ring shank. If you are really good at soldering then chances are you can skip this step.
Take your sanding stick and follow the curvature of your ring while you sand out the solder. Be sure to get the inside of the ring, if needed, with a round sanding stick.

Step 11 | File A Flat Spot On Your Ring For A Good Solder Connection
Filing a small flat on your ring band will create a better connection when you solder on your setting. Two flat surfaces connect better than a flat and a round surface.
You'll also want to solder on your setting on the opposite end from your original solder joint on your ring band. This will help to not re-melt that solder seam when you go to solder on your setting and, in the future, if you or your customer want to have it resized then you can just cut a chunk out including that original solder joint. You don't want multiple solder joints on a single ring band.

Step 12 | Solder On The Setting
Set your ring band up in your third hand with the flat spot facing downward. Flux that flat spot along with your setting. Position your setting upside down and move your third hand with the ring band over it so both surfaces are touching and can be held in place without you holding it.
*Side note, if you have a preferred method of setting up this soldering project please do so in the way you're most comfortable with. There are a plethora of ways you can set this up for soldering.
Add two bits of solder on both points of contact between the ring band and setting. For this I'm using medium, you can use easy as well. Before you start soldering I would focus your flame on the third hand first to warm it up so it's not as much of a heat sink. Then start to focus on heating the ring band, then the ring band, and the setting, waiting for the flux to go clear, circling your flame keeping both components evenly heated, and wait for your solder to flow.

Step 13 | Clean + Polish The Ring
Toss the ring in the pickle for about 20 minutes. Then polish it up, whether that's tossing it into the tumbler or using your radial discs or your felt tip with a polishing compound. Once it's nice and sparkly we're ready to set the stone (my favorite part)!
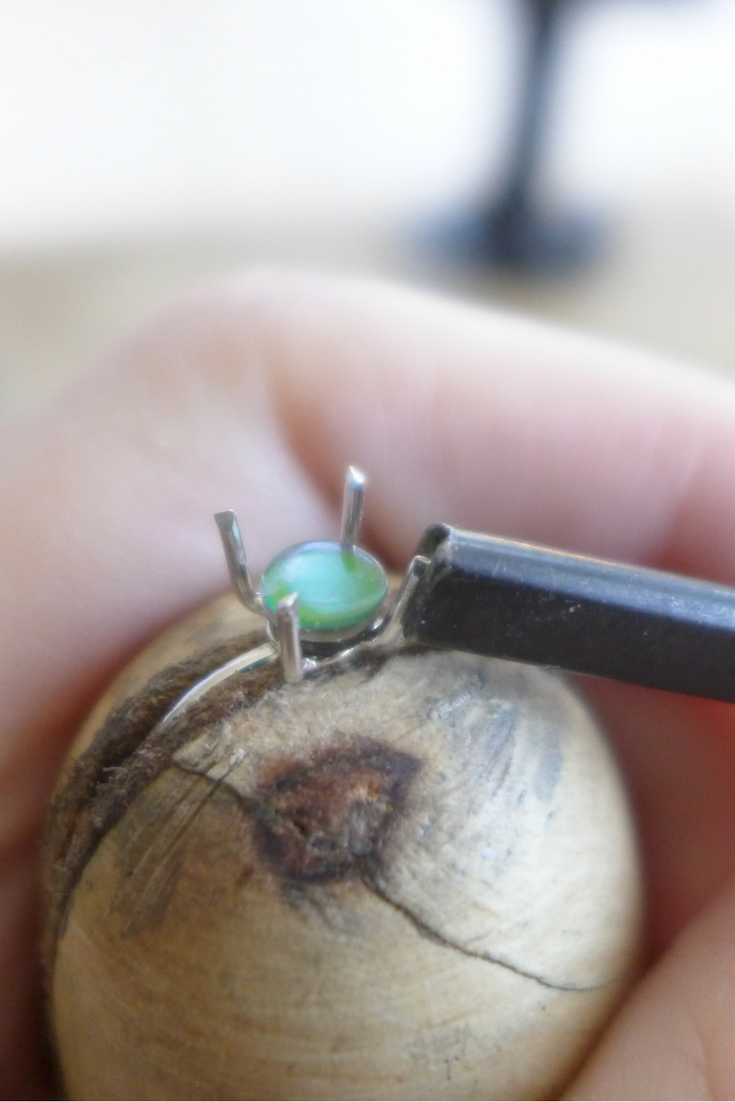
Step 14 | Setting The Stone
Place your ring in your ring clamp and place your stone inside the prongs. Now, I have both a prong pusher and a bezel pusher. The prong pusher has a little grove that sits over the prong to help you push the prongs over without slipping, which I love! But it doesn't allow you to push the prong right up against your stone to get a super tight closure so I also like to use the bezel pusher which is flat to help push it down for a tighter fit. I'll show you how.


First I take my prong pusher and I go from south prong to north prong and east prong to west prong in order to keep the stone center. I began by pushing the prongs up next to the stone as much as I can so that the prongs are pretty much squeezing the stone inward.
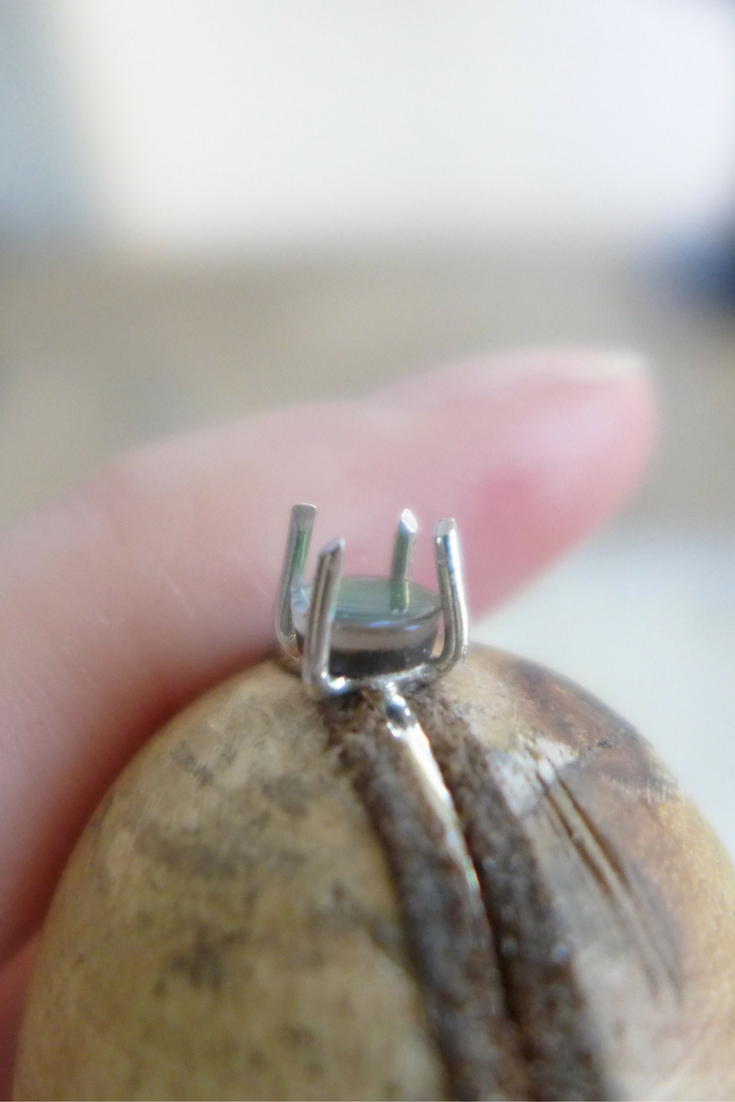
After I have that tight squeeze and my stone isn't moving I'll then, still with the grooved pusher, begin pushing each prong inward and down onto the top of the stone. I also go in the same pattern of north-south and east-west. You'll notice that my prongs are pretty long, don't worry about that, I'll cut them to size after the stone is set. I like to work with longer prongs because it gives me leverage and something to push down for a tighter setting.
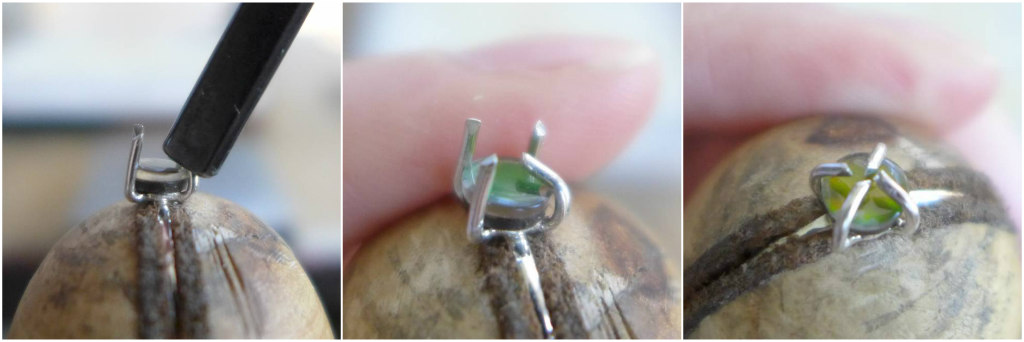
As you can see in the center photo, the prong isn't laying super flat against the stone. So once I push down all prongs with the grooved pusher I then take the flat pusher and go over each prong pushing downward. Be gentle, too, because your stone can crack, especially with more delicate stones like opal or this ammolite I'm working with. I actually chipped this stone, but not while pushing the prongs, it chipped afterward when I was adjusting the whole setting as it was sitting a bit wonky.


Step 15 | Trim Your Prongs
Wow, step 14 was pretty long! But the stone setting part is very important so there's a lot of details to cover.
If you're setting a bigger stone then you probably don't need to trim your prongs at this point after trimming them the first time in step 8. But for smaller stones, you only need about a millimeter to hold your stone in place but that's not enough metal to push over, which is why there are two trimming of prong steps in this tutorial.
So most of the time when you're cutting wire it's advised that you use the flush side of your flush cutters to get a nice flat cut, which you can totally do it that's the look you're going for with your prongs. If that's the route you want to go then you would file the top of each prong down so the top of your setting is nice and smooth and doesn't catch on sweaters and your hair.
But, the look I love going for with prong settings is a claw type of look. So instead of trimming my prongs using the flush side of my flush cutters I flip it over and cut with the opposite side which tends to pinch your wire creating a point. Then I take my file and create more of a pronounced point and clean them up from cutting them.


Step 16 | Finish Ring
Now all you have to do is take your rubber wheel and smooth out any burs, polish your whole ring, and you are finished!
I really hope you enjoyed this tutorial! It took quite a while to create and I hope I answered a lot of questions. I want to continue to put of super detailed and in-depth tutorials for you all so I really appreciate the love and support from you, it really means a lot to me!
Please let me know if you have any questions at all, just post them in the comments below. I encourage you to leave a comment rather than privately emailing me with questions that can be answered publicly so everyone can benefit from it. =)